Battery switch on travel trailer function is crucial for managing your RV’s power. Understanding how your battery switch works is key to preventing dead batteries, electrical problems, and even potential safety hazards. This guide breaks down everything you need to know, from identifying your switch type to troubleshooting common issues, ensuring smooth sailing on your next adventure.
We’ll cover different battery switch types, their locations, proper operation, and how they interact with other electrical systems in your travel trailer. Think of this as your complete, easy-to-follow manual for mastering your travel trailer’s power system.
Battery Switch Types in Travel Trailers
Understanding your travel trailer’s battery switch is crucial for managing power and preventing accidental discharge. Different switches offer varying levels of control over your house batteries and how they interact with your trailer’s electrical system. This section will explain the common types, their operation, and how to identify them.
Battery Switch Types
Travel trailers typically use one of two main types of battery switches: the 1-2-Both switch and the disconnect switch. While both control battery power, their functionality differs significantly.
1-2-Both Battery Switch
This is the most common type. The “1” position connects only the main battery (typically the starting battery for your tow vehicle); the “2” position connects only the house battery (used for your trailer’s appliances and lights); and the “Both” position connects both batteries. Internally, it’s a simple rotary switch with multiple contact points. Imagine a rotating dial that physically connects different sets of wires based on the selected position.
| Feature | Description | Pros | Cons |
|---|---|---|---|
| Switch Positions | 1, 2, Both | Offers granular control over battery usage. | Can be confusing for first-time users. A slightly higher risk of accidentally connecting both batteries when only one is needed. |
| Internal Mechanism | Rotary switch with multiple contact points. | Relatively simple and reliable. | Can be prone to wear and tear over time with frequent use. |
| Typical Location | Usually near the battery bank, inside a compartment. | Easy access for maintenance and switching. | Access might be difficult depending on the trailer’s design. |
Disconnect Switch, Battery switch on travel trailer function
This switch simply connects or disconnects the house battery from the trailer’s electrical system. It’s a simpler on/off switch, typically a toggle or rocker switch. Internally, it’s a basic on/off mechanism, a simple break in the circuit.
| Feature | Description | Pros | Cons |
|---|---|---|---|
| Switch Positions | On/Off | Simple to understand and operate. | Less control over battery usage. |
| Internal Mechanism | Simple on/off mechanism. | Generally very reliable and long-lasting. | Offers no ability to isolate or select specific batteries. |
| Typical Location | Often found near the battery bank or inside a main electrical panel. | Easy access for disconnecting the battery in emergencies. | Limited functionality compared to a 1-2-Both switch. |
Identifying Your Battery Switch Type
1. Locate the Battery Switch
The switch is usually near your battery bank, often in an accessible compartment.
2. Examine the Switch
Look at the switch’s markings. A 1-2-Both switch will clearly show these positions. A disconnect switch will simply have an “On” and “Off” indicator.
3. Test the Switch (with caution)
If unsure, carefully turn the switch to different positions (if it’s a rotary switch) and observe the effects on your trailer’s electrical system. Use a multimeter to verify power at different switch positions to confirm which type of switch you have. Remember to disconnect the negative terminal of your battery before working on the switch to prevent accidental shocks.
Battery Switch Location and Accessibility
Finding your travel trailer’s battery switch quickly can be crucial, especially in emergencies or when performing routine maintenance. Knowing where it’s located and ensuring easy access is a key aspect of responsible RV ownership. This section will discuss common locations, the importance of accessibility, and safety considerations.The placement of a battery switch in a travel trailer varies depending on the manufacturer and model.
However, some common locations include inside a dedicated compartment near the battery itself (often under a hinged access panel), within a storage compartment near the tongue, or even inside a small access panel on the exterior of the trailer. Less common, but still possible, is placement inside the main control panel near the interior entry.
Common Battery Switch Locations
Common locations often prioritize ease of access for maintenance tasks, such as disconnecting the battery for winter storage or addressing electrical issues. However, safety should always be the primary concern. Placement near the battery is logical, but if the battery is in a hard-to-reach or poorly ventilated location, that impacts accessibility and safety. Placement in a readily accessible compartment close to the trailer tongue is a frequent and practical choice, though this isn’t always feasible depending on trailer design.
Interior placement near the control panel is convenient, but this should be balanced against the risk of accidental contact and proximity to other electrical components.
Importance of Accessibility
Easy access to the battery switch is essential for several reasons. First, disconnecting the battery is a critical safety step before performing any electrical work on the trailer to prevent accidental shocks or short circuits. Second, disconnecting the battery helps preserve battery life during periods of non-use (like winter storage), preventing parasitic drain and prolonging its lifespan. Third, quick access to the switch is crucial in emergency situations, such as a fire or electrical fault, where rapidly disconnecting the power source is vital.
So, you’re an audiophile who travels? Awesome! Planning your next trip? Check out this guide on audiophile travel setups for tips on keeping your ears happy on the go. It’s all about packing light without sacrificing sound quality. Then, once you’ve got your portable setup dialed in, consider browsing audiophile travel setups for ideas on incorporating your passion into your vacation destinations – maybe find a local listening room or concert! You’ll be surprised how easy it is to enjoy high-fidelity sound wherever you go.
Safety Considerations for Battery Switch Placement
The location of the battery switch should always prioritize safety. Never locate the switch near flammable materials such as propane tanks, gasoline, or stored chemicals. Adequate ventilation around the switch and battery is also critical to prevent the buildup of potentially explosive hydrogen gas, a byproduct of battery operation. The switch itself should be clearly labeled and easily identifiable, and ideally should have a weatherproof cover if located externally.
Optimal Battery Switch Placement
Imagine a small, clearly marked access panel located near the tongue of the trailer, but slightly offset to the side, away from the propane tank and any potential hazards. This panel should be easily accessible from the outside of the trailer without requiring tools to open. Inside the panel, the battery switch should be clearly visible and easily operated, with sufficient space around it for ventilation and to avoid accidental contact with other components.
The switch itself should have a clear “ON” and “OFF” indication. The area surrounding the panel and switch should be free of obstructions and clearly visible in daylight conditions.
Function and Operation of the Battery Switch
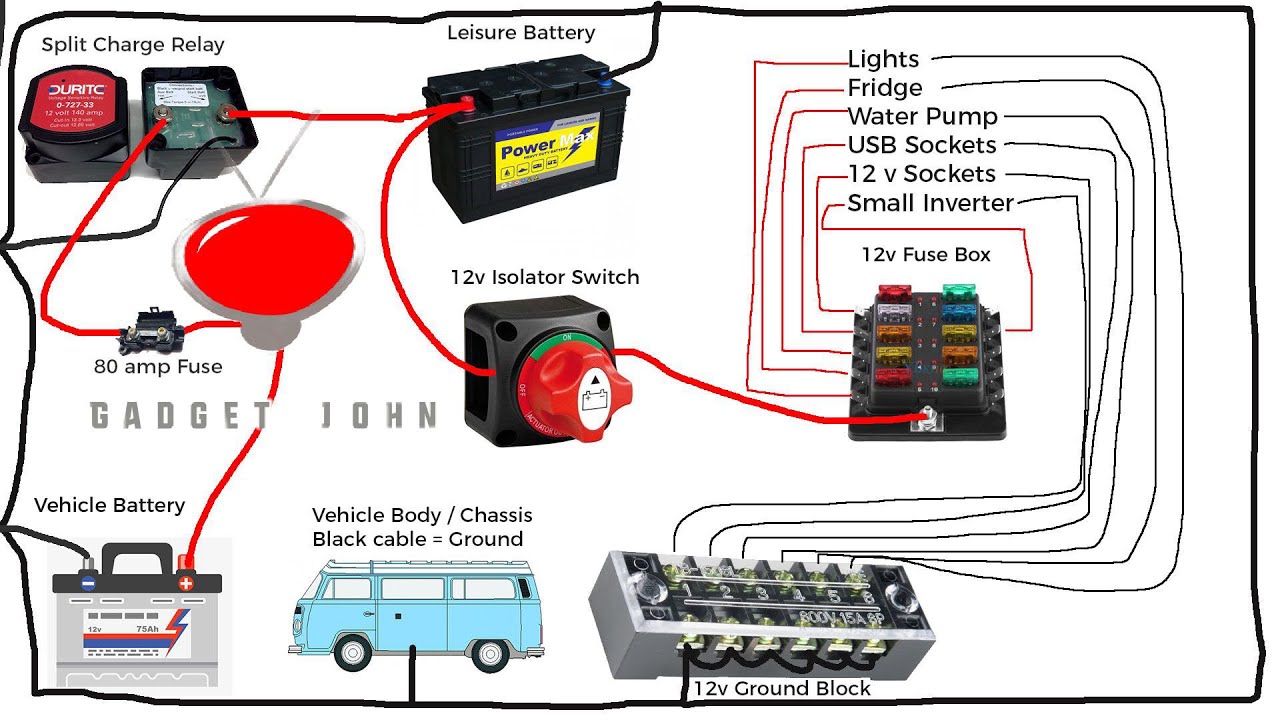
Your travel trailer’s battery switch is your main control for managing power flow between your house batteries and your tow vehicle. It’s a crucial component for preventing unwanted battery drain and ensuring a smooth electrical experience on your adventures. Understanding its function and proper operation is key to keeping your RV running smoothly.Proper use of the battery switch prevents unwanted battery drain and protects your batteries from damage.
Incorrect operation can lead to dead batteries, leaving you stranded and needing a jump start. It also protects your vehicle’s battery from being drained by the trailer’s systems.
Battery Switch Operation: Preventing Battery Drain
The battery switch typically has several positions: “Off,” “Vehicle,” “House,” and sometimes “Both.” The “Off” position completely disconnects both your house batteries and the vehicle’s charging system. The “Vehicle” position connects only your vehicle’s battery to the trailer’s charging system, allowing the vehicle to charge the house batteries while driving. “House” connects only your house batteries to the trailer’s electrical system, enabling the use of appliances when disconnected from the vehicle.
“Both” connects both the vehicle and house batteries together, often used for situations requiring high power demand. Never leave the switch in the “Both” position for extended periods when the vehicle is not connected as this can quickly drain your vehicle battery.
Best Practices for Extending Battery Life
Always turn the battery switch to the “Off” position when your trailer is stored for extended periods, especially during winter. This prevents parasitic drain from small electronics drawing power from your house batteries even when everything appears to be off. When traveling, use the “Vehicle” position to charge the house batteries. After arriving at your campsite and disconnecting from your tow vehicle, switch to the “House” position to power your trailer’s systems.
So, you’re an audiophile who travels? Awesome! Check out this guide on audiophile travel setups for tips on keeping your ears happy on the go. It’s all about packing light but smart, and prioritizing sound quality. Then, once you’ve got your portable setup dialed in, explore some amazing destinations – maybe even use a resource like audiophile travel setups to find locations with great acoustics! Remember, the journey is as important as the destination, especially when it involves amazing sound.
Avoid frequently switching between positions, as this can create unnecessary wear and tear on the switch and connections. Regularly check your battery voltage levels to ensure they are properly charging and not experiencing excessive drain.
Power Flow Diagram
Imagine a simple diagram with three main components: the vehicle battery, the house batteries, and the trailer’s electrical system. The battery switch acts as a gate controlling the flow of power.* Off: The switch is like a closed gate. No power flows between the vehicle battery, house batteries, or the trailer’s electrical system.* Vehicle: The switch opens the gate between the vehicle battery and the house batteries, but keeps the gate to the trailer’s electrical system closed.
Power flows from the vehicle battery to charge the house batteries.* House: The switch opens the gate between the house batteries and the trailer’s electrical system, but keeps the gate to the vehicle battery closed. Power flows from the house batteries to power the trailer’s appliances.* Both: The switch opens both gates, allowing power to flow between the vehicle battery, house batteries, and the trailer’s electrical system.
This provides the most power but should only be used when necessary.
Troubleshooting Common Battery Switch Problems

Your travel trailer’s battery switch is a crucial component, ensuring you can easily manage power to your various systems. Problems with this switch can leave you stranded without lights, water pumps, or other essential functions. Understanding common issues and how to troubleshoot them is key to maintaining your RV’s electrical system.
Battery switch problems often stem from simple issues that can be easily resolved with basic tools and a bit of know-how. More serious problems might require professional help or a switch replacement, but a systematic approach to troubleshooting can often pinpoint the cause quickly.
Corrosion
Corrosion is a frequent culprit in battery switch malfunctions. Over time, exposure to moisture and the battery’s acidic environment can create a buildup of corrosive material on the switch terminals and connections. This buildup increases resistance, reducing the flow of electricity and potentially causing complete failure. Visual inspection is the first step. Look closely at the terminals and connections for any green or white powdery substance, signs of pitting, or discoloration.
If corrosion is present, carefully clean the terminals using a wire brush, baking soda paste, and a terminal cleaner designed for automotive applications. Ensure everything is completely dry before reconnecting. Severe corrosion might necessitate replacing the switch entirely.
Loose Connections
Loose connections are another common problem. Vibration during travel can loosen the nuts and bolts securing the wires to the switch terminals. This can interrupt the electrical circuit, leading to intermittent power or complete failure. To diagnose this, firmly tighten all connections at the battery switch. Use a wrench to ensure a secure fit, but be careful not to overtighten and damage the terminals.
If the problem persists after tightening, check the connections at both ends of the wires leading to and from the battery switch.
Malfunctioning Switch
Sometimes, the battery switch itself might malfunction. This can be due to internal wear and tear, damage from corrosion, or simply a faulty switch. Testing the switch involves using a multimeter to check continuity. With the switch in the “on” position, the multimeter should register a low resistance between the input and output terminals. A high resistance or no continuity indicates a problem with the switch itself.
In this case, replacing the switch is usually the best course of action.
Troubleshooting Steps
A systematic approach to troubleshooting will help you efficiently identify and resolve the issue. Follow these steps:
- Visual Inspection: Carefully examine the battery switch and its connections for any signs of corrosion, loose wires, or physical damage. Clean any corrosion you find.
- Tighten Connections: Firmly tighten all nuts and bolts securing the wires to the switch terminals. Check connections at both ends of the wires.
- Continuity Test (Multimeter): Use a multimeter to test the continuity of the switch in the “on” position. A low resistance indicates a functioning switch; a high resistance or no continuity indicates a faulty switch.
- Check Fuses and Breakers: Ensure that all fuses and circuit breakers related to the battery system are functioning correctly. A blown fuse or tripped breaker can mimic a battery switch problem.
- Battery Voltage Test: Check the voltage of your batteries to rule out a low battery condition. A low battery may prevent the switch from operating correctly.
- Switch Replacement (If Necessary): If all else fails, replacing the battery switch is often the most effective solution. Ensure you select a switch with the appropriate amperage rating for your system.
Mastering your travel trailer’s battery switch is more than just flipping a switch; it’s about ensuring reliable power and preventing costly repairs. By understanding the different types, locations, and functions, along with common troubleshooting techniques, you’ll be well-equipped to handle any power situation on the road. Safe travels!
Q&A: Battery Switch On Travel Trailer Function
What happens if I leave my battery switch in the “off” position?
Leaving the switch off completely disconnects your house batteries from the trailer’s electrical system, preventing any drain but also disabling any powered appliances.
How often should I check my battery switch connections?
Inspect your connections at least once a year, or more frequently in harsh weather conditions, looking for corrosion or loose wires.
Can I use a different type of battery switch as a replacement?
While possible, it’s best to replace with the same type to maintain compatibility with your existing wiring. Consult a professional if unsure.
My battery switch feels loose. What should I do?
A loose switch indicates a potential connection problem. Tighten any loose screws or bolts; if the problem persists, consult a qualified technician.
